Monday 30 March 2015

Making fun

I've busied myself yesterdaywith lots of creative bits.

I started with my first attempt at a Free Standing Lace (FSL) item.  This is made using a soluble stabiliser (I used Fabri-Solvy), which is washed away when the design is complete.

Turns out the hanging loop isn't in the hen's centre of gravity (I'll need to see if I can correct that, it means editing the source design), so I had to lie her down on some black stuff to photograph her.  
 I have 9 more hens and 10 cockerels in the set, and I expect I'll make them at Christmas. The two sets were from embhome.com

Next, I tried my hand at a couple of mini snowflakes.There were 10 in the set, again from embhome.com.  These came out really well, and I'll be making more for the tree (or maybe for cards) at Christmas. I think I'll try metallic thread for them. 

That was enough FSL for today,  so I turned my attention to some of this month's birthday cards.  I made this for our granddaughter, who is learning to play the harp.  The phone camera doesn't pic up the detail. I had some Barbie-pink netting with some silver glitter spots on, so I put that over the card and embroidered the design on top.  I then cut away the excess.   I think I should have chosen mesh  (or Organza) populated more densely with spots, but it's OK.

Next, another version of a card for my niece.  This is my second attempt... With the first, I didn't want to use spray adhesive on the card (it gums up the needle and gets over the hoop),so I used magic tape.  When I peeled the magic tape off it wrecked the card.

With this second attempt I used spray adhesive to float the card, and I floated a layer of tearaway stabiliser on top of that too so I had two layers of stabiliser. The stitching was too dense to put straight on to card really, but it looks OK. Mostly. Well, if you don't look at the poor placement of the "r".   The original version had stars in several colours, I decided to just use one colour here.
I've left the small needle in the machine (must not forget that!), as I have another card to do.

Idiot!

I had an Ocado delivery coming today.  Late last night, just before the cut-off time, I remembered that I wanted to add a shower puff thing to the order.  I did a quick search for "puff" and soon found them.   They were quite expensive for bits of nylon,  but they did a lovely orange and a lovely lime green, and on offer at 3 for 3 so I added them to my trolley.


The delivery arrived this evening and DH unwrapped one of the puffs - rather nice of Ocado to wrap them - to put in the shower. He brought it downstairs for me to look at.  It was a bit odd. It was  rather flat and wrapped in coloured paper.

He looked at the wrapper.

It was an Orange Tissue Paper Pom Pom.

"This Paper Pom Pom Decoration is the perfect addition to your birthday party, garden party, wedding, or barbeque. Pom Pom Decorations also make great fiesta decorations! Coordinate with other solid colour party supplies and party decorations for a very colourful occasion! "

Sunday 29 March 2015

Memory tricks

When I re-started playing the organ, after many years of not playing at all, I was surprised at how much I remembered .  I stopped learning to play the organ when I was about 15, I think.  I carried on playing, intermittently, but I didn't actively learn anything new.

When Orla arrived I found her so easy to play, easy to play well.  I found I could play lots of things I'd never played before. I bought new books, I learned to play dozens and dozens of new songs.

I also learned to play some challenging (for me) pieces,  having to work hard and repeatedly at some bits to get them right. I don't waste energy on getting cross with myself.  I've learned not to get stressed about it, I know that  I will get there. Each time I've "mastered" one of these challenging pieces I feel a sense of accomplishment,, both for the achievement itself and for not getting worked up about it.

I've just this weekend finally managed to master a tricky few bars on an otherwise fairly easy piece, and I'm really happy about it.

I will have to keep playing it though because I've realised that my fingers don't retain the information as well as they used to.    When I was younger, I would find it easy to retain a learned song,  now I have to play it every so often, otherwise I forget a bit. They just aren't going in to my long term, automatic, memory.

The other thing I have noticed is that I can't play many of the new songs without the music in front of me.  That's a big difference to when I was younger.

Today I was tinkling the keys and my hand started to play The Arrival of the Queen of Sheba.  I was fascinated as my right hand managed to play the whole of the melody - well, as much as I had learned when I was 15 (It was the last piece of music my teacher got me to play).   Apart from the opening few bars, I couldn't remember the tune in  my head, but my fingers did.  It was a bit like watching Thing in The Addams Family as my hand moved over the keys.

I dug around in a cupboard and found the music.  When I tried to play using my left hand and foot as well, the whole thing fell apart.  And shortly after that, my right hand - which was getting a little tires I think - decided it couldn't remember it all anymore either. 

I don't know how I can get my recently learned pieces into my long term memory storage, maybe it just isn't possible?  

I think I'll select a few pieces and teach (force) myself to play them from memory, rather than by reading the music.Perhaps that will do it.


Saturday 28 March 2015

Ups and Downs

It's been a very up and down week.

I got up one morning to find a sodden towel by the radiator in the bathroom.  I picked it up and, somehwat gingerly, sniffed it.  To my relief, it didn't smell of anything in particular. I mentioned it to DH who said the radiator had leaked.   We cleaned up, and put kitchen towel underneath, to see if we could spot the leak. Of course it stayed dry.

A couple of days later, I was cleaning the bathroom, and I found water underneath the soil pipe. Nowhere near the radiator. It was defintely a soil pipe leak. Probably.  I called DH to investigate further.  Yup, definitely a leak. 

We discussed the implications of a fix, which included having to cut out a rectangle of flooring around the toilet.   A hole in the floor isn't a disaster. We've been talking about reflooring the bathroom for several years now, but the associated implications (moving the toilet, radiator, and basin) kept resulting in us deciding to "leave it for now"

The toilet had to be fixed so DH who is a whizz at almost every handman job imagineable, set to work.He did a fab job of neatly cutting ot the flooring.  We left the toilet unplumbed for a couple of days while the floor dried out.

By coincidence - genuinely - I had an email from Karndean advertising the third release of their new "loose lay" product.  Because of the hole in the floor, and because Karndean is are solid flooring everywhere else in the house,  I took the time to read about it. It sounded interesting, so DH had a look.  Then we went to look at some.   And then we came home and discussed it.  It's a completely different sort of flooring to what we have elsewhere, but it is much easier to lay. More importantly, individual pieces can easily be removed and replaced.    

We agreed we'd do the bathroom, but not the rest of the upstairs. The bathroom could get away with having differnet flooring, so if we put it down and didn't like it enough to use it elsewhere, then no harm done.
We disagreed about the laying pattern (the joy of the online visualiser), but we'd agreed on 2 possible colours - both from Karndean's first release.   We also agreed that we'd buy enough to do it the way I would prefer, and the nature of the product means we can lay it out and see what we think before commiting to the final pattern.

We left the choice of colour to percolate overnight and, by the morning, we'd each come round to the other person's point of view! How typical of us.

It's ordered now, so we'll see.

Meanwhile, my "back" ache is getting worse.  The anti inflammatories prescribed by the Doc haven't helped that, although they have worked on my knee.  The blood tests on Friday were relatively painless, helped by the fact I've decided to stop being such a baby about it and the fact that the lady who took the blood was really kind and calm. I thanked her because it was probably the least stressful blood-taking I'd ever had.

I've not been interested in machine embroidery for a few days, I was wondering whether I was now officially bored of it.   I had an email from one of the sites I've purchased from, and they were having an Easter sale.  I didn't buy anything, but I did check my Wish Lists on some of the other sites and found sales all over the place.   I bought a few things, and I had a go at a couple of them today.  They came out well and I'm feeling a little more energised about it now.


Monday 23 March 2015

Still on the case

Some longer zips arriived on Saturday,  so I attempted to make a simple pencil case from a designer I haven't used before.  It was awful. So awful, I must have not followed their sparse instructions (and useless photos)  properly.  I threw it in the bin.

After that debarcle, I was feeling rather fed up, and couldn't be bothered to do anything apart from clearaway the worktop. 

Hmm. Not good.  I know what I'm like, and I could feel there was a risk of me avoiding doing anything for days - so, before I finished clearing up, I made myself cut out fabric ready to make a Digistitches 5x7 zippered case.

The cut fabric and zip sat on the table for the restof Saturday, and all day yesterday.  Each time I walked past it, I smiled at the fabric and my careful pattern matching.

Today I decided to give it a go.

It was relatively quick. After all, I had the fabric already cut,  and I'd already made the 4x4 case so I knew what to expect.

I was really pleased with the end result.

The Digistitches cases are unpadded but are fully lined.  They are quick and easy to make.

I'm going to make a bigger one I think.

They are missing one vital size - a size I already have with my Embroidery Garden case. The EG case required whip stitching, which I just can't do neatly or reliably.   However, maybe I can use the technique used by Digistitches of leaving a larger bit of fabric at the open hem, and then wundaweb it together.

I had a quick look at the EmbroideryGarden instructions, and it might be possible. I'll try it.

I'm not sure which I'll try first - the bigger Digistitches case or the attempted adaptation of the EmbroideryGarden  design,

I bet you can't wait to see, lol.


Friday 20 March 2015

Quick chop

Made a simple card for my neice's upcoming birthday. It's a while away, I'm just trying to get organised.

Similar process to the card I made for Darling Stepson. This is a smaller card, and I've cut the name vertically (becuase the cards don't support themselves too well horizontally).

This time I used a fabric adhesive spray on the fabric. This worked really well...although I think I must have got some on my Cammy cutting mat.  A bit of a problem as it was permanent adhesive that I used. Botheration.


Warm

It's been warm(ish) so we haven't been lighting the fire and I haven't filled up the log basket.  The sun was streaming through the french window today, and the basket has now been commandeered by a sleepy ginger cat.


A case in point

it's been a busy and "productive" few days.  Well, productive in the sense that I have produced something tangible.  Possibly not productive in the sense of how long they took.

I still can't believe that I can produce anything, it's so out of my comfort-zone,  so.... not me.

Before "First up", I made a really pretty little credit card case,  the design came from Embroidery Garden. I don't have a photo, and I can't find the case.... I think it's possible I threw it away.  It was a lovely case, but it required finishing by hand which I am incapable of doing.  I didn't realise it needed this, otherwise I wouldn't have bought the design pack.

So, on to the things I do have evidence of.

First up was a tissue case. I have several, bought, cases. None with a zip.  Here's the one I made using a design from a company called Five Star Fonts,
Zip Closed

Zip Open
 Of course I didn't manage to capture the detail with my phone's camera. The zip and lining are emperor purple. The top is lightly padded and therefore had to have a quilting stitch over it.


Following on from the success of the Tissue case, I purchased a set of cases from Five Star Fonts.  I only have 7" zips at the moment (the postman will bring me longer ones shortly), so a couple of days ago, I tackled a 5x7 sunglasses case.  This required batting (padding).  I tried with my polyester batting, but as part of the process requires stitching directly onto the batting, this was a fail.

I popped to our local fabric shop to buy some cotton batting. and some interfacing (which, confusingly, looks like stabiliser to me). I couldn't remember why I needed interfacing, I just remember having read it on some PDF instructions,  so I bought 3 different sorts.

Yesterday, I made myself sit down and try again.  It was a bit of a long process, but I think that a second attempt would be much more speedy now I know what I'm doing.   T&he cotton batting was quite thick (too thick, perhaps),  so the finished case was fairly solid.  However, as it is a specs case, I suspect this is part of the design.

This design required me to do pattern matching , so that the fabric to the right of the zip (the yellow cat) matches up with the yellow part-cat to the left of the zip.  This  time I used a bright orange fabric for the liner and a matching bright orange zip. I might try an unlined version of this - or a version lined with, say, clear vinyl - later.

Zip closed and hidden
Zip open

I still wanted something smaller, so yesterday evening I bought a zippered bag set from Digistitches. These are quick to make, don't have any batting (padding), and the final bit can be finished with Wundaweb.  I made the 4x4 purse this morning.

This time I started with the zip - I have a few brown ones - and looked for fabric to work with it. I put the pattern matching "skill" I'd learned from the Five Star Fonts one in to practise.
Pattern Matching above & below zip
Finished - Closed

Finished - open


Once the longer zips arrive I want to try making some of the larger cases. It will be interesting to compare the process from multiple suppliers, where the sizes are similar.    I also have an inexpensive design from NewfoundApplique  to try; this one has no batting or quilting.

I wonder if the grandchildren actually use pencil cases? 

Wednesday 18 March 2015

Eggsactly

We're enjoying a reasonable supply of eggs at the moment.
 
At home, only the two youngsters, Poopy and Lotti, are laying.  The other 3, who are rising 5, haven't laid for about a year now, although Florence has been crouching for me lately, so I guess she might.

At the allotment, the 3 babies (from last year's hatch)  are all laying regularly. .  As far as I can tell, the 3x rising 6 year olds aren't laying,  a bit of a shame as I wanted to try and have a baby Norman this year (having failed last year because she went broody ).     The two 4 year olds are laying at least intermittently, I know that becuase U;ve disturbed them on the next box from time to time.  The main harem, who are rising 3, are back in lay, and I anticipate a lot of broodiness as soon as the weather warms up.

We don't have a surfeit of eggs, but we do have enough to have 2 eggs each fror breakfast every day,  4 eggs a week to give to our next door neighbour,  and eggs to cook with.  Today I attempted to make Magic Custard Cake,  I'll tell you more about it when I've seen whether or not it works.

It won't last long.  Soon broodiness will kick in. It would be helpful if they didn't all go broody at the same time.


Friday 13 March 2015

Cheese

Thermie and I made some cheese scones earlier.

I used the standard Thermie recipe (which used a whopping 450g of flour), but used buttermilk instead of milk.

They are (or, more accurately, were) divine.

I might whip up another batch later.

Or perhaps I'd better not.


Cammy Crazy

It was most unexpected.

I bought the Cameo Silhouette ("Cammy" as s/he is now known) to cut fabric shapes for applique and embroidery projects.   After a shaky start, it's now working really well.

Of course Cammy wasn't designed to cut fabric, s/he (can't tell yet whether Cammy is a he or a she) was designed to cut paper and vinyl and stuff;  the fabric cutting  is just a bonus.

I had decided to make Darling Step Son 1's birthday card, and had sought out and bought some aeroplane fabric especially.  I knew what I was going to make, I loaded the designn onto my embroidery machine, laid out the fabric... and then I changed my mind.


I thought about Cammy and what s/he could do.  So, I decided to try  a "simple" cut of his name in the card,  backed with fabric.  Despite the " ", it really was easy.... it just took me 4 or 5 versions of text before I found a combination of font and size that showed the aeroplane pattern off reasonably.

It wasn't easy to stick the fabric to the card at the front - double sided
tape and glue dots didn't stay stuck to the fabric. In the end, I used Pritt to stick the fabric to the inner lining sheet, then used double sided tape around the inside frame and stuck the lining sheet to that.

The images are a bit big, really,  to be used in a name cutout.  I suppose I could have cut a shape....maybe an aeroplane shape... and backed that..... 

No. I'm not doing it again.    I'm not.

But I will bear that in mind for other items.


Tuesday 10 March 2015

Gobby chickens

Since Lotti - our loopy Exchequer Leghorn - came back in to lay,  she and Poppy have been really noisy.  Sometimes it's non-stop,  and that's when there is nothing of note for her to witter about.  When there is, such as Poppy managing to escape - which she does regularly - then the volume and the shrillness increase dramatically.  She's such a tell-tale.

Sometimes she manages to get all 5 of them at it.

When peace breaks out, a rare occurence,  it's bliss.

Monday 9 March 2015

Naturally.

I've got an intermittent back ache. 

When it gets quite  uncomfortable, I use a small heated blanket. The gentle warmth soothes and relaxes it, and it really helps take the pain away.

I@ve been careful to put the blanket up on top of the sofa, out of the way of nosey paws.  Until today when I got up to make a cup of tea.


All of a flutter

After the trials and tribulations of the tags for the Twins,  I was hoping that the card for my mother would be a little bit easier.

I'd already made the card for my MIL.  For my mother, I had decided to make an organza butterfly. I'd seen one of these on a Facebook page a few weeks ago and had bought the design.  I kept not getting round to going to the fabric shop, so I ended up ordering some organza online - probably a less-expensive-overall option that risking going in to a fabric shop.  

The saga of the Twins stuff meant that I had had enough of embroidery to last me for a week or so.... but I wanted to make the Mothers Day card so it was done and ready to post.    The butterfly back is made first, then the wings,  then these are attached to the body. All done in/on an embroidery hoop.

I made my first butterfly, and was really pleased with the results until I realised that I hadn't quite got the body in the right position relative to the head.   It was a good learning exercise.

By a quirk of machine hoop sizes,  the back needed to be made on one sized hoop,  the wings could fit on another size, and the teeny body and assembly is done on a tiny hoop.  This was great, as it meant I could have everything hooped and ready to go, no messing about re-hooping part way through. 

My second attempt was therefore much faster.  The butterfly was most acceptable.   The design wasn't particularly cheap, it came from Embroidershoppe.com


I used an A4 sheet of 280gsm white card, which I folded in half.  I decided to use my Cameo Silhouette to carve my mother's name out of the card, which worked well (although I think Cammy was assuming I wanted to use the letters that were cut out, rather than using the cut-out, IYSWIM. That's why the O looks the way it does). 

 I stuck some complementary fabric from my stash of fabric squares to the inside cover, which added interest to the cut-out name.   Finally I computer printed an insert, which I glued to the inside front to cover up the back of the fabric.

I'm pleased with the result, and feel strangely refreshed.

Heartless

I am sick to death of making those heart shaped things!

Some of my (many) rejects
It would all have been OK if I hadn't got it into my head to stuff both sides.  I've tried many variations now, and it always almost works, but not quite.  I got close, but the stabiliser couldn't cope and statred to come away as the last little bit was stitching.   I sighed,  cut some more hearts, and worrked out how to reinforce it.  It sewed perfectly well, but was so hard (with layers of stabiliser inside) that I might as well have not bothered with the blooming stuffing.

I had to get the presents in the post this morning, so yesterday morning I decided to sew tags without stuffing.  I couldn't face doing hearts again, so I did bows instead.  Of course I had to go through the scanning etc (sidetracking to see if I could improve that side of things),


I ended up with some beautiful bows.The final versions were lovely (although not quite perfect).#

Of course I failed to photograph them before packing intrictaely fixing them to the presents and posting them off this morning.

Oh well.

Hope they like them!


Friday 6 March 2015

Silhouette Cameo - have a heart!

Having had success with getting my Bow templates into the software ,  I decided that I didn't want to use the Bow shape after all.  I wanted to add too much text, and couldn't see how to fit it on that particular shape.    I decided to use a heart shape instead.

So, I made up a heart in black fabric, scanned it, copied it, flipped it.   I then set up the Cameo, very carefully, to cut 4 hearts.  One of the pieces of fabric had a specific pattern on, so I had to be very careful to make sure I got the fabric in exactly the right place.

At this point, I tested using freezer paper and Filmoplast as interfacing (to keep the fabric rigid for cutting).  The Cameo manual indicated that the interfacing should go down with the fabric uppermost.    My wealth of experience with the machine over the last few days has shown me that that isn't right. It all works much better if you put the fabric on the cutting mat, and the interfacing on top of that.

My hearts cut out beautifully, and the one with the special design was perfect.

I used my Janome editing software to add text to the design, and off I went. I had decided to add some wadding to the heart and it seemed best to do this on the side that had the writing, the side that was uppermost n the embroidery machine.   It went well enough.  I put the back on,  and finished the item.

I had bits of stuffing poking out of the side stitches, and my attempt to trim them off ended in disaster - I cut trough some of the edging stitches.

Undeterred,  I decided to try again with the second heart.  This time I used not only vinyl as the stabiliser, but I hooped in some Filmoplast on the underside and floated some Filmoplast on the top.  Not only that, but I had learned enough to know to pre-score the Filmoplast before putting it anywhere near the vinyl.

The fabric placement stitch went down, securing the top level of Filmoplast.  I painstakingly removed the filmoplast from the centre,   and stuck down some wadding I'd prepared. It was cut into a heart shape and was smaller than the heart.  I trimmed it, and then I put on the fabric. I stuck the fabric where possible,  and added some Magic Tape to secure it.  The tacking stitch went down, perfect!  I removed the MagicTape.

Next, the candlewicking stitch. All looked good.  I changed the thread and bobbin thread, and the text went on.   Then I unhooped, turned it over, unpeeled the centre of the bottom Filmoplast and secured wadding, put the fabric on, put Magic Tape on. Put the hoop back on.   Tacking stitch. Then the edging stitch.  It all looked great, I started to clear up my work area ready to tackle the other heart again.

I got back to my machine and my happiness evaporated.

Part of the fabric had been missed by the edging stitch (you can just see the white showing above the edging stitch in the photo. It's much more evident on the real item.).  All the padding had made the fabric that bit too small (or I should have put some Magic Tape on, perhaps).  I stopped the machine,  tried using MagicTape,  and made it re-sew the edge.  A little better, but still missing parts.   :-( 

I let it finish, including the buttonholes, as at least then I could keep it as an example.  When it was finished I unhooped it and found that the other side was in a really bad way. 

I definitely should have cut the fabric a couple of mm bigger, and/or put MagicTape all the way along the edge at the second tacking step (removing it before the edge stitching happened.

Or not padded it.  But it's much nicer padded.


Never mind.  It's all good learning, and a good opportunity to work with the Studio Design software and the Cameo cutter again.

Silhouette Cameo - trial and error.

The Silhouette Cameo arrived early on Tuesday afternoon.  I left it on the side, unopened, while I carried on with domestics and other such avoidance activities.

Eventually I unpacked it, and tried it out using a design from their template library.  It worked really well, cutting the fabric beautifully!  I was going out on Tuesday evening, so I stopped there, happy that it was all going to turn out fine.

On Wednesday, I attempted to work with an embroidery design. I needed something exactly the right size, so I printed out the design info from my embroidery software.

 I calibrated my phone camera.  I tried to take a pic of the design and to import that pic into Silhouette studio.  I failed. Several times.

I then tried to do it using my flatbed scanner,  which after a bit of faffing about and watching Youtube videos (thank goodness for YouTube and the people who post there!), I managed to get my design imported.

I then completely failed to get the software to work with the design.  The manual, and the online help, were not very helpful at all,  so I googled and searched, and worked out what was wrong.  The Cameo software was trying to trace both sides of the outline instead of seeing just one line, and it was also too faint.

Next, I trued cutting out the design on some coloured paper and scanning that.  Now that actually worked - except that the edges were scrappy where I'd cut with scissors.   In terms of using the cut fabric,  it wasn't any better than what I'd been doing originally, it still required a lot of trimming.

Eventually I gave up with trying to use the printed image, and took the drastic step of actually creating the item using black fabric, and then scanning the created item.
This worked well, and I made up a bow with the cut fabric.  I then learned that the bow isn't entirely symmetrical, so I needed to create both a back and front template.  This was OK, I just copied the original scan and then flipped it.

I was then ready to try and make the real thing.


Monday 2 March 2015

Re-cluttering

I've been embroidering for days.

I wanted to make some tags to put on the Twins' birthday presents.  I bought an in-the-hoop tag design, and really liked it. I tested it out, and it stitched well and looked good.   I looked online for fabric specific to each of the two children.   I found what I wanted, and quite a lot more besides. While I was shopping for fabric for the twins, I ordered some sticky stabiliser.  And a few other bits and pieces.

Of course, when I find something easier than expected,  I have to make it more complicated. I have to try harder,  do better,  make better,  more intricate,  more detail....

I tried using vinyl as a stabiliser, to avoid getting white bits round the edge of the pieces. .  I'd bought some ages ago from that trip to FabricLand,  but I thought I'd bought stuff that was too thick.  I had ordered some thinner vinyl the other day but it hadn't arrived, so I decided to try the thicker stuff anyway. 

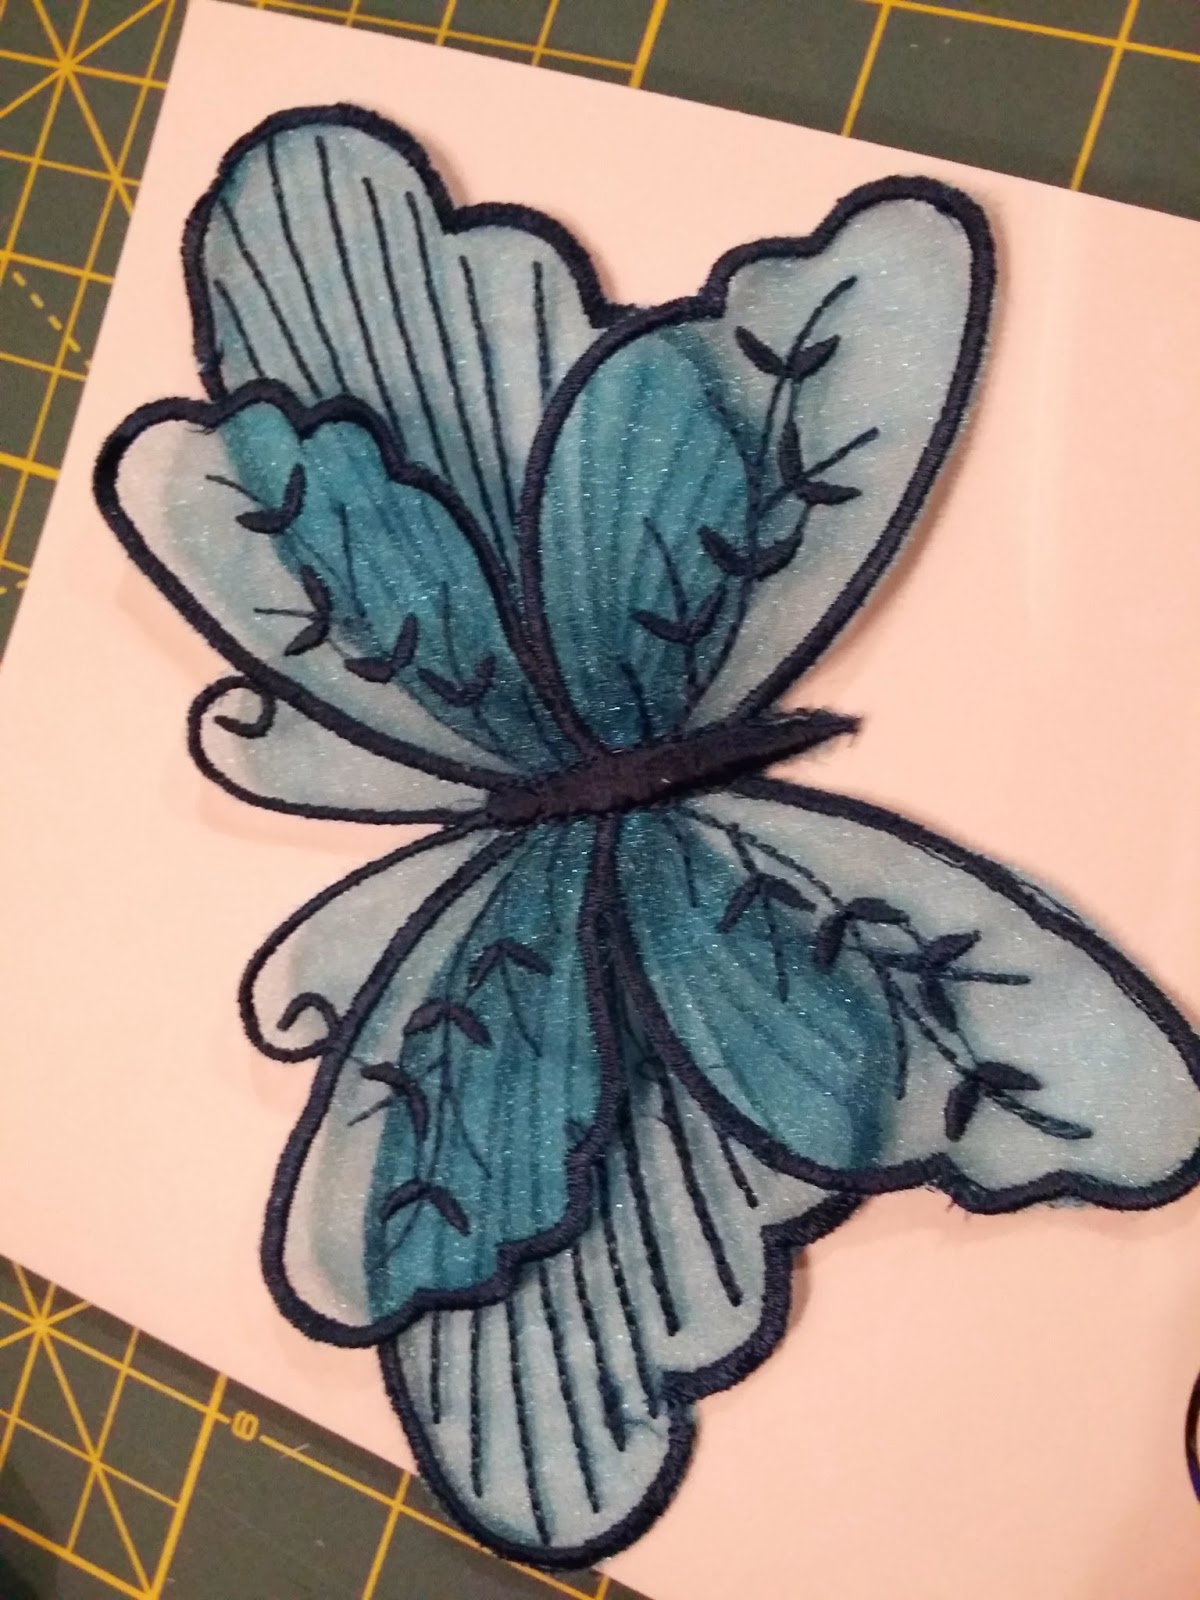
The embroidery design site I perhaps love most, BigDreamsEmbroidery,  announced a sale to celebrate something or other.  I greedily emptied items from my wishlist into my basket and bought them.     I tried out some of the designs as possible alternatives to the tags.  They were amazing.  Everyone was double sided, with different fabric front and back.

I stitched out different sizes, different fabrics.  I couldn't stop.  I tried different stabilisers.  I added text.  I threaded some of them onto ribbon so I could keep them together. 

I ordered yet more fabric squares in various sizes. It's not particularly cost effective on a cost-per-metre basis, but on the plus side it gives me a wide variety of fabric colours and patterns, and I can always go and buy proper amounts of those fabrics which I end up using a lot.

I started to get a bit fed up with cutting round the fabric on the hoop, mainly because I'm not that good at it.  I wondered about cutting the fabric first.

I asked DH if he could laser me some templates,  or build them with his 3D printer.   We discussed it in detail and decided not.   I tried making templates using the machine, I had this great idea about stitching out the outline until the paper was perforated, then that would give me a template......trouble is it doesn't help with my accuracy.

I looked online.

I found something that might work.

I asked about it on a relevant Facebook page, and the discussion that ensued was really helpful.  I watched some videos.  I showed it to DH.   I ordered it.

Fabric storage 'A'
Meanwhile, the fabric - and stuff - started arriving. On Saturday, a couple of packs of fabric-by-the-metre arrived.  And some pre-cut squares. And the tabletop sleeve-ironing board - which is a perfect size for ironing my embroidery bits and pieces and has been in use today.

Today, the post was full of little packets.  Luckily, the packs arriving in the post were mainly either pre-cut 5" squares or fat quarters so when I got them out they didn't look too much.

I've re-organised the fabric shelves.  The non-fabric stuff is now piled on the floor waiting for me to find it a new home.  I'm not sure where that's going to be, I can see this all spilling over into the spare bedroom.

Fat Quarters

I've made myself a little fat-quarter (FQ) storage box out of a cat food box, so I can pick up the whole box and bring it downstairs.    I've even made 5" square "bolts" as well.  Each FQ is wrapped round a bolt, which gives it some rigidity and means it is easy to see the pattern from the edge.  I can flick through without the fabrics all screwing up.  .


Today the stabilisers arrived, and they are all over the worktop.  

Add caption
As a test run with the sticky stabiliser - and making myself use my digitiser software - I created a personalised Mothers Day card for my lovely mother in law. 

Pic is  of my second attempt, and this is the one I'm going to send her.


I still haven't made the twins tags yet. I'm waiting for the cutter thing to arrive, and I'll use that.

Goodness knows where that's going to live.


Followers